In this tutorial you will learn how to model a 3D Diamond in 3dmax using simple polygon techniques and render with mental ray.
 1. First go to shapes -> under splines sub category select "NGon " shape. In the perspective viewport make a shape look like this.
 2. Select our shape go to--> modify panel--> change following parameters.

3.Lets extrude our NGon shape with following parameters. To do that select our shape go to modify panel, and apply "Extrude" Modifier and give following parameters.


4 Next apply "Edit Poly" modifier. Go to Vertex sub-level and select all vertices in the bottom and scale down like this.


5.After vertices scale down which means when they are close enough use "Weld tool " to weld them together.To do that select bottom vertices and under edit vertices tab, select weld settings. Increase the weld threshold until as the below picture.

6. Next goto sub level- polygon and select top polygon and extrude little bit as the below picture.

7. Afterwards extrude it again to a higher value as you can see in the picture.( Amount of extrusion depends on the size of your model)

8. With out changing selection change sub-level to vertices and scale down top vertices again to around 50%

9.Next lets make some tweaks to our diamond . First select cut tool. go to Top- View create two squares as the below picture.


10. Next step is connect vertices around as the below picture


11. Select some polygons and delete them. so now you will have a hole in your model.

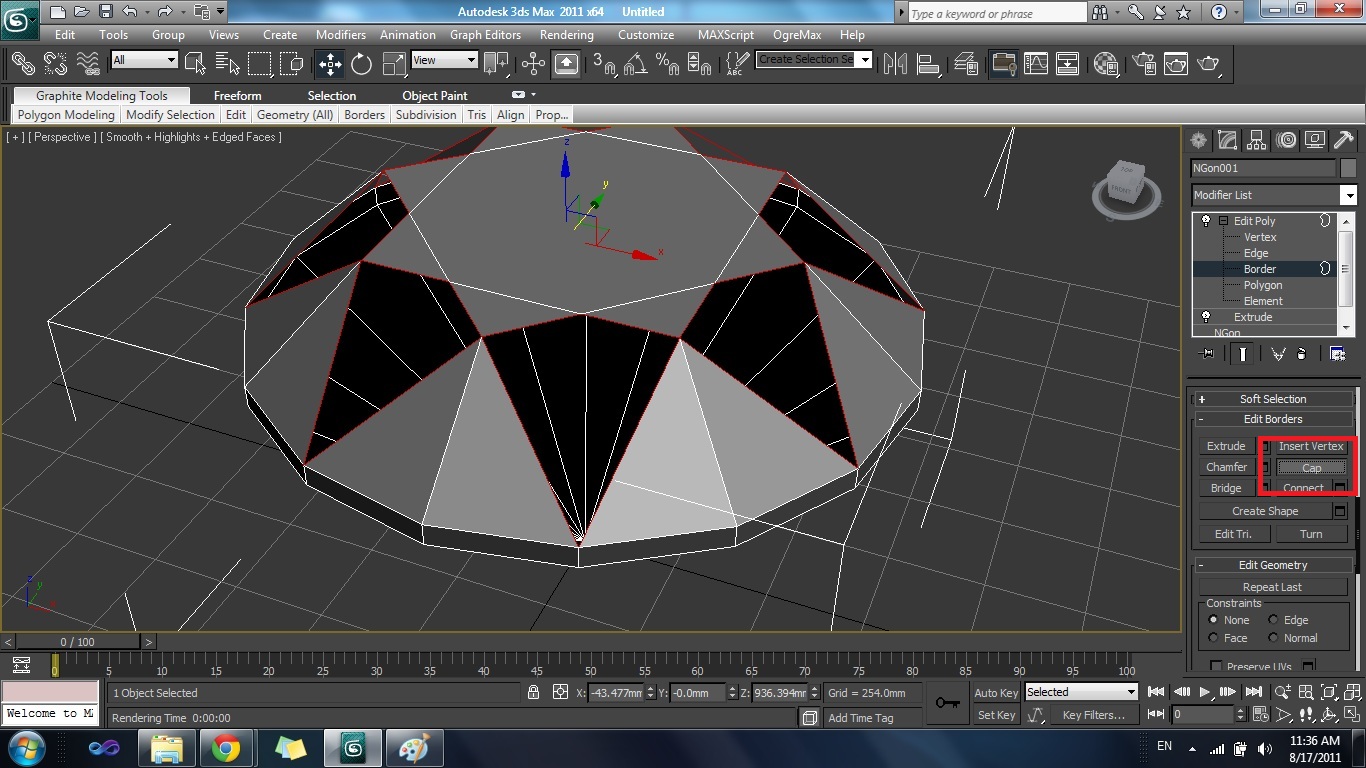
12. To fill the hole, In the "Edit Poly" change your sub-level to "Border" and select border around removed polygons and use "Cap" tool to fill the holes.


13. After some tweaks here is our final model of our diamond

14.Ok , Now we have finished our first part of the tutorial. next lets make our diamond looks more realstic by adding materials, lights and rendering techniques.
15. I have prepared my scene as follows (you can download from here).
http://www.fileserve.com/file/nbtz7D2/Scene_Files.rar
16. First change the render from scan-line to Mental Ray render, to do that open render setup dialog box ( Rendering---> Render Setup)

On the common tab, scroll down to bottom , under Assign render change Defualt scan line render to mental ray render.

17. Lets create our diamond material , first go-to material Editor( press M or Rendering-->Material Editor)
and assign a material to our diamond. Change the following parameters of the material.

A. Change type of material to Standard to "Arch & Design".
B. Set "Transperancey - 1.0 ". Change "IOR - 2.42" and "Reflective to 1.0".
Also Under BRDF tab- select "By IOR " .

18. To make scene illuminate create a skylight, to apply skylight-->
A. Crate--->Light--> Starndard Lights--> Skylight

B. Change color of light to white
C. In order to use Skylight with our metal ray render , enable the "Final Gather".( Rendering -->Render-->Indirect Illumination--->Final Gather-->Enable)

Now make a test render.

18. Change the Background color to white.
 19. To make diamond more reflective add some "Black Objects" to our scene ( Because our background color is white ). Here i have added the set of boxes and applied a black material.

 20. To produce specular highlights, lets add more lights sources to our scene.create set of omini lights and change multiplier of all Omini lights to 0.2
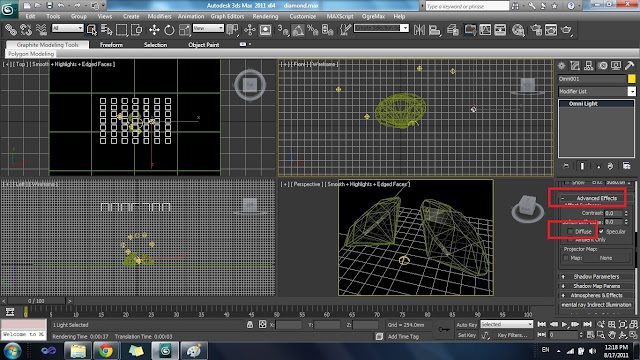
21. Turn diffuse effect off so omini light will affect only the specular characteristic( Omini-->Advacned effect-->Affect Surfaces-->diffuse) Untick the diffuse option.
Make sure that your omini lights are place in a random manner.
22. Finally lets increase the relasim by enabling caustic.Select all omini lights and our diamonds and right click --> properties--> Select mental ray tab-->Check on "Generate Caustics On"

To enable caustics rendering settings (Rendering > Render... > Indirect Illumination > Caustics and Global Illumination (GI) > Caustics > Enable)

After making some tweaks final result will be like this.( To learn about mental ray caustics check my previous tutorial)


3.Lets extrude our NGon shape with following parameters. To do that select our shape go to modify panel, and apply "Extrude" Modifier and give following parameters.


4 Next apply "Edit Poly" modifier. Go to Vertex sub-level and select all vertices in the bottom and scale down like this.


5.After vertices scale down which means when they are close enough use "Weld tool " to weld them together.To do that select bottom vertices and under edit vertices tab, select weld settings. Increase the weld threshold until as the below picture.

6. Next goto sub level- polygon and select top polygon and extrude little bit as the below picture.

7. Afterwards extrude it again to a higher value as you can see in the picture.( Amount of extrusion depends on the size of your model)

8. With out changing selection change sub-level to vertices and scale down top vertices again to around 50%

9.Next lets make some tweaks to our diamond . First select cut tool. go to Top- View create two squares as the below picture.


10. Next step is connect vertices around as the below picture


11. Select some polygons and delete them. so now you will have a hole in your model.

12. To fill the hole, In the "Edit Poly" change your sub-level to "Border" and select border around removed polygons and use "Cap" tool to fill the holes.

13. After some tweaks here is our final model of our diamond

14.Ok , Now we have finished our first part of the tutorial. next lets make our diamond looks more realstic by adding materials, lights and rendering techniques.
15. I have prepared my scene as follows (you can download from here).
http://www.fileserve.com/file/nbtz7D2/Scene_Files.rar
16. First change the render from scan-line to Mental Ray render, to do that open render setup dialog box ( Rendering---> Render Setup)

On the common tab, scroll down to bottom , under Assign render change Defualt scan line render to mental ray render.

17. Lets create our diamond material , first go-to material Editor( press M or Rendering-->Material Editor)
and assign a material to our diamond. Change the following parameters of the material.

A. Change type of material to Standard to "Arch & Design".
B. Set "Transperancey - 1.0 ". Change "IOR - 2.42" and "Reflective to 1.0".
Also Under BRDF tab- select "By IOR " .

18. To make scene illuminate create a skylight, to apply skylight-->
A. Crate--->Light--> Starndard Lights--> Skylight

B. Change color of light to white
C. In order to use Skylight with our metal ray render , enable the "Final Gather".( Rendering -->Render-->Indirect Illumination--->Final Gather-->Enable)

Now make a test render.

18. Change the Background color to white.


21. Turn diffuse effect off so omini light will affect only the specular characteristic( Omini-->Advacned effect-->Affect Surfaces-->diffuse) Untick the diffuse option.

Make sure that your omini lights are place in a random manner.
22. Finally lets increase the relasim by enabling caustic.Select all omini lights and our diamonds and right click --> properties--> Select mental ray tab-->Check on "Generate Caustics On"

To enable caustics rendering settings (Rendering > Render... > Indirect Illumination > Caustics and Global Illumination (GI) > Caustics > Enable)

After making some tweaks final result will be like this.( To learn about mental ray caustics check my previous tutorial)


