Showing posts with label Tutorial. Show all posts

Wednesday, March 16, 2011

Setting up HDRI based lighting in Mental Ray

Hi all,
 In this tutorial we are going to look at how we can use  Final gather & HDR maps to create image based lighting scene.

Step1 :

This is the scene that i am going to work with, It's simple setup teapots with some architectural maps.
Ok lets' start first we need to create sphere to work as our environment , go top view  , go to primitive section create a sphere. make sure that it'l cover our scene fully.


Step 2:
Ok , lets apply texture to our sphere. to do that go to material editor ( press m) , select available slot and change it diffuse color and ambient color to black.


Step 3 :

Click on global illumination field, put the check mark and put a bitmap into self illumination field. Apply a HDR map as your bitmap , when importing the HDR map, put the check box in 32 color data field as shown below.


Step 4:

And assign that texture to our sphere.

Step 5:

To add more details to our scene, goto render settings ( press F10), and under Indirect Illumination enable Final gather. ( make sure that you have change your render as the mental ray) . make a test render ( press F9 ) , you can see much more realistic scene.


Step 6:

but we have lot of lights , to override this effect add Standard omni light in scene. make it intensity to lower value ( 0.2 ) .


Step 7 :
 To make more realistic . goto our final gather settings and we need to adjust some parameters to yield a high quality scene.


Step 8:

After some tweaks i get a following render output. Also further we can add some exposure control to our scene.

Step 9 :

To add exposure control goto rendering menu----> exposure control. choose mr Photographic Exposure control


Step 10 :

make some tweaks to parameters as shown in below.


here some example by using several HDR Images.


Thursday, January 13, 2011

Create A Realistic Outdoor Scene using 3dsmax Daylight

Hi all,

In this tutorial we are gonna focus on 3dsmax lighting concepts. Learn how to use a Daylight system to make a realistic outdoor scene usind 3dsmax 2010.

Step 1:

first we have to add Daylight system, to do that go to create --> Lights -- > Daylight System.


Step 2:
Then you'l see dialog box appears, press yes. goto top view and click and drag , so first it'l draw a compass , once that finished we can drag out the sunlight source. Distance between light source and scene doesn't matter.


Step 3:
Select daylight source and goto modify panel.Under Daylight parameters click "setup".


Step 4:
Now , it'l bounces off to motion panel.Under control parameters you can adjust the position of the sun. you can give real word measurements.
My parameters:


Step 5 :
Also you can give your location. click "Get location" , then you'll see "world map" window, from that select your location.


Step 6:
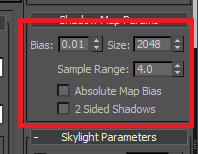
To modify shadow, select light source and go to modifier panel.Under general parameters, change the shadow type to "Shadow Map".Under shadow map parameters , change parameters as shown in the picture to yield high quality.


Step 7 :
To adjust parameters , you need to do via "Exposure Control", to do that , goto Rendering menu -- > Exposure control


Step 8:
To have a realistic scene , we can adjust these exposure control parameters, i used following parameters.you can try different combination of these parameters.


Step 9:
After adding environment maps and textures.Here is the final output of our scene.A realistic outdoor daylight system.

Tuesday, January 11, 2011

Lightning Bolt Effect 3D MAX

Hi all,
 This is a 3d max particle flow tutorial , i'm going to create lightning bolt effect using 3d max. Lets get started.

Step 1:
First go to particle flow.(Graph Editors----->Particle Flow  or you can press 6). look at the  following picture.


Step 2:
Right Click on the empty space , and  goto "New"----->"Particle system "-----> "Standard flow". Rename basic standard flow, "PF_Source01" to "Lightning Bolt".Change Display type to "Dot".


Step 3:
Goto Birth event , change emit stop time 100 and make sure you click on "rate" radio button , set rate value to 30,000.In order to get better performance ,put a "Cache View port"  operator into "Geometry" field.


Step 4:
Delete  "Rotation " event and "Speed " event. Put "Shape" operator  into global node by dragging "Shape" operator into "Render_Geomatry" field.


Step 5:
Right click on position icon ----> insert---->Position Object 01.Click on the "Add" button ,select geometry which ever you want( in my case its, tesla coil ,which is a simple torus ) .This will act as a originate point  of our particle system.Hit play button , now you can see particles are emitting from our tesla coil.


Step 6:
Next, we need to add some forces. Goto , Create --> Space Warps --> Forces --> Wind  & Drag. Add both forces into perspective view.Select both force icons and change co-ordination  to (0,0,0) as shown
below.


Step 7:
Select Wind force and goto modifiers panel and change the parameters as shown below. Strength - 3.5 ,Turbulence -4 , Frequency - 2.0 , scale - 0.2 .


Step 8 :
Select Drag force and goto modifiers panel and change paramters as shown below.on time - 0 , off time - 150, z axis Strength- 18

Step 9:
You can place your particle source(tesla coil)  where ever you want. In this tutorial i use ( x=0, y= 100 , z= 200).


Step 10:
Then we have to link forces to our particle flow. To do that goto particle view ( press 6 ) , Right click on our Event_01---> Append --> Operator --> Force. Select force operator, on the right panel click on the add button , and select the two forces.


Step 11:

We don't want to remain our particle till the last frame, so append a "Delete " operator into our PF_Flow and change the parameters as shown below. Life span = 7, variation = 0.


Step 12:
Next , we need to create branches from our main Lightning branch, to do that right click on our main event---> Append --> Test --> Spawn.


Step 13 :

Select "Spawn " operator and change the parameters as shown below.


Step 14:

Do a Shift Drag to "Display" Operator and make a copy of  "Display" Operator. Rename this event as "Branch".


Step 15:
Connect "Spawn event and our new Display Operator" .


Step 16:

Add a new "Delete Operator" to out Branch event, set the life span parameter to 1. To give more realstic look we can add second 'Wind" force and link with out "Branch_Event" as we did to our main event.


Step 17 :

Finally we have to add a Glow to our particle flow, to do that right click on our main event and goto properties. Give object ID as 1.


Step 18 :

Goto Rendering Menu --> Effects. Under Effects tab add "Lens Effects".


Step 19:
Under "Lens effects Parameters ", add a "Glow" ( select glow from left panel and click on the right arrow)


Step 20 :

Select "Glow', and then you'll see a new panel called "Glow Element" and change parameters as shown below.


Step 21 :
Under the "Glow Element" window goto "Options tab" , make sure that you have checked "Object ID" radio button. give Object ID value as 1 ( This should be same as the main event object ID)


Step 22 :

Here's the final output.