Hi all,
In this tutorial we are gonna focus on 3dsmax lighting concepts. Learn how to use a Daylight system to make a realistic outdoor scene usind 3dsmax 2010.
Step 1:
first we have to add Daylight system, to do that go to create --> Lights -- > Daylight System.

Step 2:
Then you'l see dialog box appears, press yes. goto top view and click and drag , so first it'l draw a compass , once that finished we can drag out the sunlight source. Distance between light source and scene doesn't matter.

Step 3:
Select daylight source and goto modify panel.Under Daylight parameters click "setup".

Step 4:
Now , it'l bounces off to motion panel.Under control parameters you can adjust the position of the sun. you can give real word measurements.
My parameters:


Step 5 :
Also you can give your location. click "Get location" , then you'll see "world map" window, from that select your location.

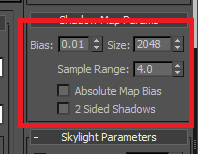
Step 6:
To modify shadow, select light source and go to modifier panel.Under general parameters, change the shadow type to "Shadow Map".Under shadow map parameters , change parameters as shown in the picture to yield high quality.

Step 7 :
To adjust parameters , you need to do via "Exposure Control", to do that , goto Rendering menu -- > Exposure control

Step 8:
To have a realistic scene , we can adjust these exposure control parameters, i used following parameters.you can try different combination of these parameters.


Step 9:
After adding environment maps and textures.Here is the final output of our scene.A realistic outdoor daylight system.

In this tutorial we are gonna focus on 3dsmax lighting concepts. Learn how to use a Daylight system to make a realistic outdoor scene usind 3dsmax 2010.
Step 1:
first we have to add Daylight system, to do that go to create --> Lights -- > Daylight System.

Step 2:
Then you'l see dialog box appears, press yes. goto top view and click and drag , so first it'l draw a compass , once that finished we can drag out the sunlight source. Distance between light source and scene doesn't matter.

Step 3:
Select daylight source and goto modify panel.Under Daylight parameters click "setup".

Step 4:
Now , it'l bounces off to motion panel.Under control parameters you can adjust the position of the sun. you can give real word measurements.
My parameters:

Step 5 :
Also you can give your location. click "Get location" , then you'll see "world map" window, from that select your location.

Step 6:
To modify shadow, select light source and go to modifier panel.Under general parameters, change the shadow type to "Shadow Map".Under shadow map parameters , change parameters as shown in the picture to yield high quality.

Step 7 :
To adjust parameters , you need to do via "Exposure Control", to do that , goto Rendering menu -- > Exposure control

Step 8:
To have a realistic scene , we can adjust these exposure control parameters, i used following parameters.you can try different combination of these parameters.


Step 9:
After adding environment maps and textures.Here is the final output of our scene.A realistic outdoor daylight system.

Thanks for the tutorial. I'm making an exterior scene with animation for uni and have been chucked in the deep end. I only started using 3DS Max for the first time 3 weeks ago so this is a great help to me.
ReplyDelete